
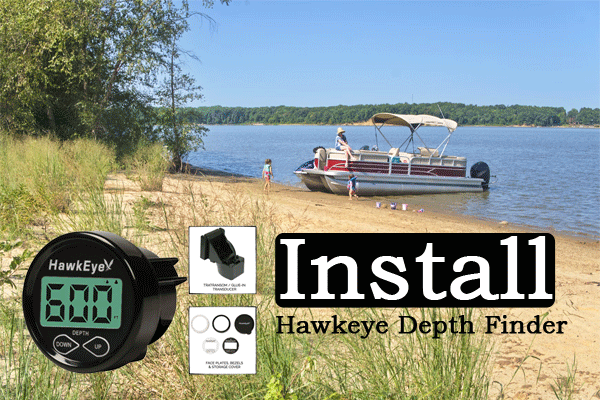
Pontoon boats are a popular choice for many boating enthusiasts due to their stability, spaciousness, and versatility. Whether you're fishing, cruising, or just enjoying the water, having a depth finder can be an invaluable tool. The Hawkeye Depth Finder is a popular choice for many boaters because of its accuracy and ease of use. In this blog, we'll walk you through the steps to install a Hawkeye Depth Finder on your pontoon boat.
1. Choose the Right Location
Before you start the installation process, it's crucial to select the right spot for your depth finder.
**Transducer Placement:** This is the part of the depth finder that sends and receives sonar signals. Ideally, it should be placed where it will remain submerged even at high speeds and where it won't be affected by the boat's turbulence. A common spot is near the rear of the pontoon, close to the center but away from the motor or any other obstructions.
**Display Unit:** This should be placed where it's easily visible and accessible to the driver or the person fishing. The helm or dashboard is a common choice.
2. Mounting the Transducer
*Clean the Area:** Before mounting, ensure that the chosen spot is clean and free of debris.
**Use the Mounting Bracket:** The Hawkeye Depth Finder typically comes with a mounting bracket for the transducer. Attach this bracket to the boat using the provided screws. Make sure it's secure.
**Position the Transducer:** Once the bracket is in place, attach the transducer. Ensure it's angled correctly, typically facing straight down into the water.
3. Setting Up the Display Unit:
**Mount the Bracket:** Just like the transducer, the display unit will have its own bracket. Mount this where you've chosen to place the display, ensuring it's secure and within easy reach.
Attach the Display: Once the bracket is in place, attach the display unit. Make sure all connections are tight and secure.
4. Wiring
**Route the Cables: Run the cables from the transducer to the display unit. Ensure they're not in a position where they could get caught or damaged. Use cable ties or clips to secure them in place.
**Connect to Power:
The Hawkeye Depth Finder will need to be connected to your boat's power supply. Follow the manufacturer's instructions to ensure a safe and correct connection.
5. Calibration and Testing:
**Turn It On:** Once everything is set up, turn on the depth finder. Follow the manufacturer's instructions for any initial setup or calibration.
**Test in Shallow Water:** Before heading out into deeper waters, test the depth finder in a shallow area to ensure it's working correctly.
6. Safety First:
Always remember to turn off the boat's power when working with electrical components. It's also a good idea to have a professional or someone experienced with boat electronics assist you if you're unsure about any step.
Conclusion
Installing a Hawkeye Depth Finder on your pontoon boat can greatly enhance your boating experience, whether you're fishing or just cruising. By following these steps and always prioritizing safety, you'll be ready to explore the depths in no time! Safe boating!